Configure Advanced Wi-Fi Settings and Split SSIDs

Access Your Advanced Wi-Fi Settings
Before performing the actions below, navigate to your dashboard using one of these two methods:
Use the GFiber Mobile App
Before you begin, download the GFiber App from the Google Play Store or the App Store.
- Open the GFiber App and sign in.
- Tap Network.
- Tap Network settings.
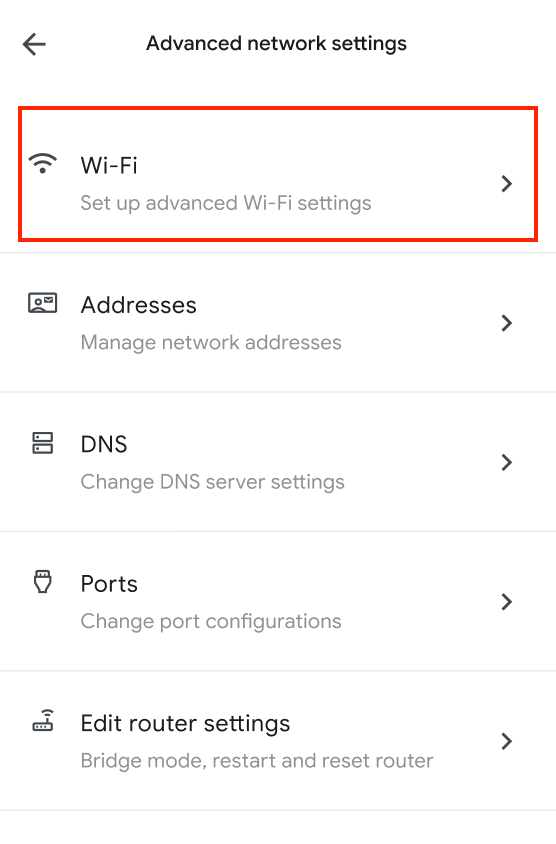
- Tap Advanced network settings.
- Tap Wi-Fi.
Use the GFiber Web Portal
- Sign in to your GFiber account using your email and password.
- Click Network at the top-left corner.
- Click Edit Network.
- Click Edit next to Advanced network settings.
Manage Wi-Fi Network Names (SSIDs)
Your Wi-Fi network's name is technically known as an SSID. Most GFiber routers operate on multiple Wi-Fi frequency bands simultaneously, typically 2.4 GHz, 5 GHz, and 6 GHz (on supported models).
Setting a unique SSID for each individual band is known as a split SSID, meaning you broadcast a distinct network name for each Wi-Fi band (e.g., one named "Home_2.4" and another named "Home_5").
While split bands can be useful for certain older smart home appliances, it is strongly recommended to use the same Wi-Fi name for all your bands for the following reasons:
-
Seamless roaming: Devices automatically switch between the 2.4 GHz, 5 GHz, and 6 GHz bands as you move around your home to maintain the strongest available signal.
-
Optimized performance: Your router dynamically directs devices to the specific band that provides the best real-time speed and stability.
-
Simpler setup: You only manage one network name, removing the need to guess which band your devices should join.
-
Fewer issues: Provides more stable active connections with fewer internet drops or wireless slowdowns.
Option A: Use the same Wi-Fi name for all bands (recommended setup)
-
Open your Advanced network settings using the navigation steps at the top of this article.
-
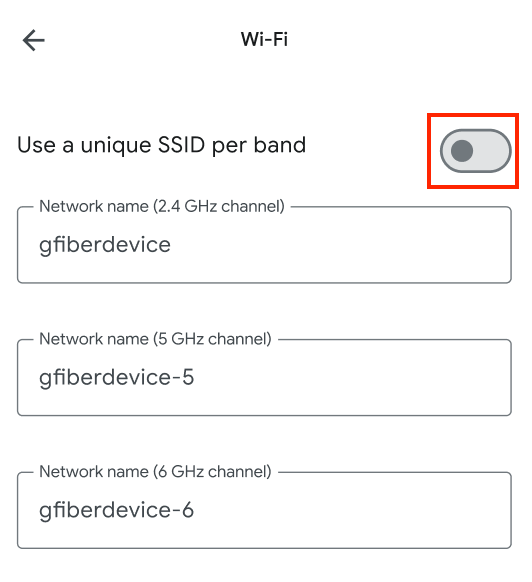
Toggle the setting option Use a unique SSID per band to OFF.
-
Click or tap Save. Your changes take effect immediately across all bands.
Option B: Use different Wi-Fi names for each band (split SSID setup)
-
Open your Advanced network settings using the navigation steps at the top of this article.
-
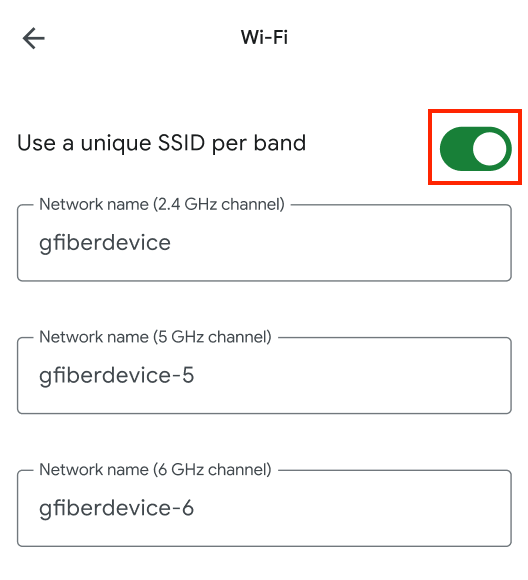
Toggle the setting option Use a unique SSID per band to ON.
-
Enter your custom desired name for each individual band (2.4 GHz, 5 GHz, and 6 GHz if available). SSIDs must be between 1 and 32 characters long and are strictly case-sensitive.

Advanced Roaming Hack: To allow for faster roaming between high-performance 5 GHz and 6 GHz bands while allocating the 2.4 GHz band strictly for legacy smart devices, you can type a unified identical network name for the 5 GHz and 6 GHz bands, while keeping the 2.4 GHz band name completely unique.
- Click or tap Save. Your changes take effect immediately across all bands.
Important Things to Note Regarding Split SSIDs:
-
Your security password remains identical across all bands; you cannot assign a unique password to each individual split frequency.
-
Wireless devices will briefly disconnect from the network when you apply and save these changes.
-
By default, your 2.4 GHz band adopts the primary name you set for your network. The 5 GHz and 6 GHz bands will automatically have “-5” and “-6” appended to the end of their network names.
-
If your mobile devices or laptops have trouble finding or connecting to the newly split 5 GHz network after saving, try restarting your router or performing a complete factory reset.
Broadcast Your Wi-Fi Network Name
By default, your network name (SSID) is set to broadcast publicly, making it visible to nearby devices searching for a Wi-Fi signal. You can hide your network by turning this broadcast off.
To turn SSID broadcast on or off:
-
Open your Advanced network settings using the navigation steps at the top of this article.
-
Toggle Broadcast Wi-Fi network name to ON or OFF.
-
Click or tap Save.
Manage Security Protocols and Wi-Fi Channels
Legacy Security Mode (WPA / WPA2)
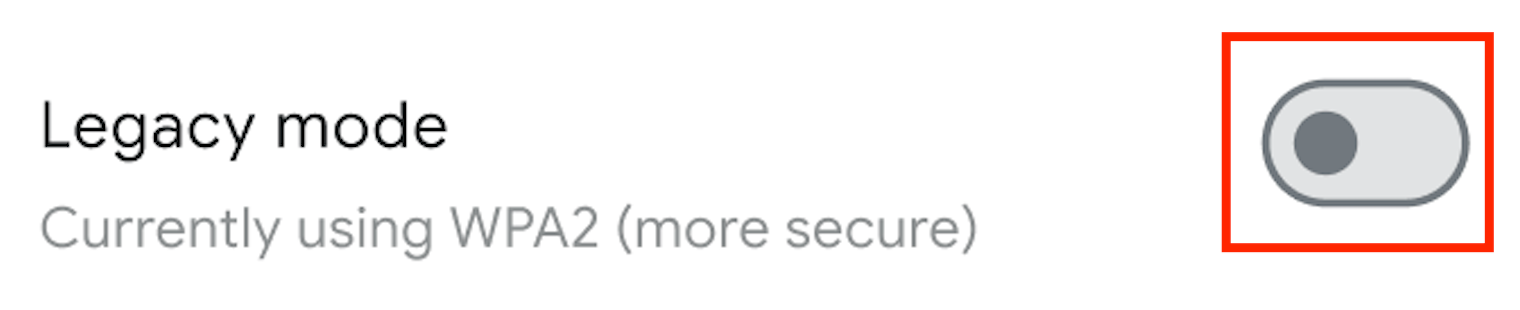
Legacy mode is only available for customers with an original Network Box. Your GFiber router uses robust WPA2 wireless encryption by default. If you have legacy smart home appliances, older laptops, or older electronics that only support older WPA protocols, you can enable Legacy mode to allow simultaneous support for both WPA and WPA2 connections.
To change security protocols:
-
Open your Advanced network settings.
-
Under the Security protocol header, click the dropdown menu or toggle switch.
-
Select or toggle WPA/WPA2 (Legacy).
-
Click or tap Save.
Manual Channel Assignment
Manual channel controls are only available for customers with an original Network Box. Your Wi-Fi network uses specific channels to communicate. Think of them like different radio stations — each channel number represents a specific radio frequency. By default, your router may automatically optimize and switch its channels to avoid traffic congestion. You typically do not need to alter this setting.
However, you might consider manually choosing a static channel if your local Wi-Fi speeds feel sluggish due to local environmental interference (like crowded apartment blocks). You can use a third-party Wi-Fi analysis app on your phone to scan and identify which nearby channels have the least traffic and strongest signals.
To set a channel manually:
-
Open your Advanced network settings.
-
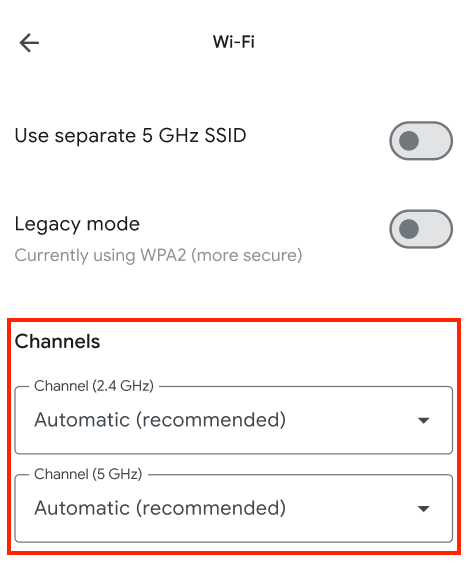
Locate the Channels section. Next to each frequency, select your preferred manual channel number from the available drop-down lists.
-
Click Save.
FAQs
If a specific device won’t connect, you can try temporarily separating your Wi-Fi bands. Connect the device, and then merge the bands back together.
-
Open advanced settings: Follow the instructions at the top of this article to open Advanced network settings.
-
Name your networks: Keep your current network name (for example, Lauren’s Home) for your 2.4 GHz band.
- Name your 5 GHz network Lauren’s Home-5.
- If you have a 6 GHz network, name it Lauren’s Home-6.
-
Connect the device: Connect the device you’re troubleshooting to the 2.4 GHz network (Lauren’s Home in this example).
-
Merge the SSIDs: Once the device connects successfully, merge your SSIDs back into a single network. Use your original network name (Lauren’s Home) and the same password.